6 Mini-Lesson Ideas for Teaching Effective Dialogue

Thursday, November 10, 2016
The past couple of weeks I have incorporated 5 different mini-lessons that 
taught my students to effectively add dialogue to their writing. Hopefully! ;)
Mini-Lesson #1: Dialogue Models
I used the form seen below to introduce basic dialogue models to the students.  Under each individual model, the students wrote their own example.  Students also looked through the novel they are currently independently reading and hunted examples of each model.  
dialogue models, upper grade writing, dialogue lesson, 5th grade writing
Mini-Lesson #2: Color Coding Models
In the next mini-lesson, I gave each student 4 different colored index cards which they cut apart and arranged into the different models.  This provided a good visual as long as they stayed with a consistent color pattern.  The pattern we used was:

ORANGE: subject or speaker
PINK: speaker tag (how the speaker spoke)
YELLOW: what was spoken by the character
GREEN: quotation marks and commas

Students are keeping this in their writing folder so they can pull it 
out throughout the year when needed!
speaker tag lesson, dialogue lesson, color coding dialogue
Mini-Lesson #3) Speaker Tags
Students brainstormed different ways to say more basic types of speaker tags like the ones seen below.  After students independently researched these speaker tags using the chrome books, we made a classroom anchor chart where students came up and added one word to each square.  This created a good discussion tool as some of the words were great examples or synonyms for more common speaker tags, and how others were not very good examples or wouldn't make sense. 
synonyms for said
Mini Lesson #4) SAID is not DEAD!
As teachers we often use the expression SAID is DEAD! when teaching dialogue. However, said can actually be a very powerful word when it is paired with a prepositional phrase. As we were looking through novels that the students were reading and finding examples of dialogue, we noticed that many authors used long phrases to explain how a character sounded or looked when they were speaking.  Since we had been previously studying prepositional phrases, students were able to incorporate this into their writing.
Examples:
"Watch out! The bowl is going to tip over!" My mom said.
"Watch out! The bowl is going to tip over!" My mom said with a distraught look on her face.
Mini Lesson #5) Writing Dialogue with Comics
Students were so excited when I pulled out this comic of Charlie Brown talking to Linus. The students rewrote the comic using dialogue models.  This allowed the students a lot of practice with writing speaker tags to create the appropriate mood and tone as well as changing speakers. They loved it!
comic strips in the classroom, comic strip mini-lesson
Here is another example! We talked about how important it is the vary your dialogue models so that there is variety in your conversations.
5th grade, writing mini-lesson, narrative writing with dialogue
Mini-Lesson #6) Students Create Comics 
Finally, it was time for students to create a comic based on their narrative draft that we had been writing.  The students read over their narratives and pinpointed a place where they would want to add dialogue.  They used the template seen below to draw the comic. 
After students drew the comic, they wrote the conversation below and finally added it to their narratives! She was able to add this conversation to her narrative and it really took her writing to the next level! 
writing, 5th grade, panicked teacher
Click on the image below to get this free template!
Other templates seen in this blog post can be found in my narrative writing unit! 
Click on the link below to be taken there!
Please share your tips or tricks for adding dialogue!

Pumpkins, Prepositions, and Poetry!

Monday, October 17, 2016

We are in the middle of studying prepositions and we kicked off our preposition studies with some Pumpkin Preposition Poetry. We started with the Preposition Song seen below that I still remember from my sixth grade English teacher sung to the tune of Yankee Doodle Dandy.  

Teaching the Prepositions

Teaching prepositions through song is very catchy and such an easy way for students to recall the different prepositions! I still catch myself singing this to determine if a word is in fact a preposition. :) 

Anchor Chart

I also made this anchor chart based on the to help students 
visualize different prepositions. At the time, we had caterpillars in the classroom and we actually placed one on an apple to help students get an "idea" of how they could use prepositions. :)


Digging for Prepositions!

Let's dig through the text! To have the students get in some real world practice, they worked in partners to find 3-5 prepositional phrases from the book that they were reading! They took turns going up to the chart seen below to record their prepositional phrase. This was not an easy task, but they came through and it was also fun to see what everyone was reading! (5th graders at the time:))


Pumpkin Preposition Poems

Finally, the students took a crack at writing the prepositions in a poem about pumpkins. A great sentence starter we used was, "A Pumpkin Grows" which students then chose a preposition from the song and wrote a phrase that made sense to them. They came up with some great poetry! Click on the picture below to get more detailed templates that you can use with your students! 


Below is the finished product. The students typed their poems on the computers and inserted a picture of their rough drafts along with inserting a picture of a real pumpkin. They looked great on our door!

Johnny Appleseed for the Bigger Kids

Sunday, September 25, 2016
Can the big kids celebrate Johnny Appleseed Day??? Well, yes they can!!! I teamed up with my teaching neighbor Teaching in Room 6 to end the week off with some apple fun.  I searched the internet and found some awesome passages that I was able to print out for the students. Recently, we have been discussing the importance of having multiple sources while doing research, so this was the perfect opportunity for students to break out into groups, research different articles, and then compare information that was found.  Here are the links to the different passages that I found!


Johnny Appleseed Article #1
Johnny Appleseed Article #2

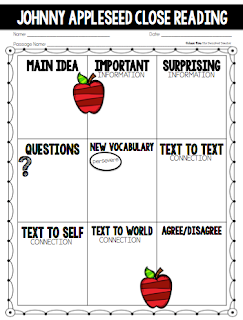
Since we have also been focusing on Close Reading, the students used the following paper to target the different Close Reading Annotations with their groups. Click on the template below the picture to use this in your classroom.
My class is also focusing on Idiom/Adage/Proverbs of the Week this year, so this was the perfect opportunity to get thematic and post an "apple" related Adage. What better than, "An Apple a Day Keeps the Doctor Away?" At the beginning of the year, my students had a pretty firm grasp on Idioms, but Adages/Proverbs? I had to look up that one too! Since it is a major standard in 4th and 5th grade, I have an entire bulletin board dedicated to it.  Click on the picture below to get a more in depth look at how I post this in the classroom AND the week's worth of posters to display in your classroom! Also, there is a"Wonderopolis" article on this adage/proverb which is a great introduction for the students to read AND great if you have Chrome Books or a technology center in your classroom. 

I am finding that focusing on ONE Idiom/Adage/Proverb of the Week is a great way to incorporate this standard into my weekly routine.  The students usually work on this as part of their morning work!

Since we are a STEM school, we found this amazing idea from Kerry Tracy, called Apples Ahead, and it just fit in perfect with what we were doing. Students had to build structures that would be strong and sturdy enough to carry an apple while they participated in a relay race. This was a great opportunity for students to build hands on models using creativity and teamwork! They were given 35 minutes with specific materials (cardboard, yarn, planters tape, brown bags, pipe cleaners, aluminum foil, pencils, brads, string) to SHARE in order for each team member to build a sturdy model.  
Here is a picture of the kids in action! Each group had 4 team members working on their own individual structure. The 35 minutes went by quickly as they made their models. Some teams realized that they needed EVERY structure in their group to perform well in order for their team to be successful, whereas others acted more competitively within their team, realizing later that they needed to all do well in order for their team to succeed!    
Here are a few pictures of the teams in action!
This was one of the structures that the students voted the STRONGEST! She zoomed through the relay race since she made such a strong base for her hat (and her self-confidence was just beaming which was awesome!)
This girl won the most CREATIVE since she used every single type of material that was given to her. It was great to see the kids proud of their structures and comparing and analyzing why some structures did better than others.  
All in all, I was so excited about giving the students a "break" from their regular routine! Take a look how my friend Stephanie celebrated Johnny Appleseed day! I am LOVING all of her tips with how to incorporate Google Classroom with her legend vs. truth activity…..Take a peek into her room here!

Place Value Activities

Monday, August 8, 2016
I always start the year off with Place Value, so I have compiled the different resources I use here in one place.  I use the following numbers and place value posters to provide a visual model of the different place value digits.  Students are able to use this as a handy reference throughout our place value unit as it is displayed in the front of the room. I have made this FREE for you! Just click on the pic below.

The next download has a variety of place value templates and exercises like the one seen below where students practice different place value concepts.  In the following weather disaster investigation students practice word form, standard form, expanded form, comparing numbers, and finding the sum and difference of larger numbers. These resources center around numbers to the billions. 

Don't forget to have students fill out EXIT TICKETS at the end of your lesson! I like to do this at least once a week in order to assess my student's learning. Click on the link below to go to my free download for Math Exit Tickets.
I am excited about trying out the next project with my students this year. Students will work in groups of 6 to complete place value concepts using their BIRTHDATES! My favorite part of this project is students are working together and collaborating with each other to complete each task. 
Click on either picture to be taken to the BIRTHDATE PROJECT!
What are your tips and tricks for teaching place value?

5 Ways to Get to KNOW Your Students!!!

Wednesday, July 27, 2016
5 Back to School Must Haves
The first thing starting the year that is a top priority for me is to get to know my students.  While this takes time, here are some of the things I do the first week of school to get to know everyone.
#1) Learning Styles Surveys
You can never be too over-prepared for the first couple of days of school!!! I love have these surveys printed and ready to go for a moment when I need a 10-20 minute activity.  They are great reflection tools and great for students to add to their portfolio.  Also, another good way to get to know the kids! 

#2)All About Me TOTEM POLES
I am SO excited about this next project I am going to try this year! Got Paper Towel Rolls??? I have been collecting mine all summer for the kiddos to do this take home project so I can get to know them better.  The directions? Cover the roll with ANYTHING in your house that you can find that reveals information about you.  I had so much fun creating mine and this is how I will introduce myself to my students the first day.  I am excited to have my students create and write about each item they decide to add to their totem pole.  I'm thinking it will make a great looking bulletin board. I'm SO excited about these!!!
#3)Parent Informational Sheet
Something I can do immediately is go to the expert on the child….the parent. 2 must-knows for myself are allergies and asthma, so I highlight those on the top right of the form.  I also like to get down to the nitty gritty and ask specific things about behavior and academics so that I can begin to familiarize myself with where a student may need extra support.
#4) Index Card
The first day is all about survival! Getting to know 34 names can be tough. When the students walk in, I like to give them an index card where they can fill out basic information that would be helpful for me to refer to. I just love having the cards that I can quickly shuffle through and figure out who is who! I attached the PDF to the pic below so you can easily print and put under the doc reader so the kids know what to write.

#5) Getting to Know You Towers
Every year I love to have my students create these Getting To Know You Index Card House Towers.  They offer an alternative to the traditional all about me project and look really great for Open House! Click on the pic below to see further instructions and to get a copy of the template.
Other Resources to Kick Start Your Year!
Please share what you have had success with the first week of school. 
Do you have a special way to get to know your students?

Comparing and Contrasting Novels FREEBIE!

Saturday, April 2, 2016
Since I have only been teaching 5th grade for a few years, I was not quite sure which novel I had wanted to use for our next Novel Study. So my friend Stephanie (Teaching in Room 6) recommended and lent me her ENTIRE set of novels for Gregor the Overlander, by Suzanne Collins. My class (and myself) were SO thankful! I had actually never read this book before, was not sure what to expect, but my class and I were hooked IMMEDIATELY just by looking at the cover.  This book really captured their interest.  What 5th grader wouldn't be intrigued by people in a foreign land riding bats?

Throughout the novel study, every time I told students to get their books out, I was often received with cheers and smiles. As we read the novel, students curiosities rose. WHERE did the author get the inspiration for writing this book? As we researched, we found out that the author, Suzanne Collins, inspiration for writing Gregor was from Alice and Wonderland.  This led to the PERFECT opportunity for teaching comparing and contrasting. I printed out a passage that gave the overall gist of Alice and Wonderland HERE. The following compare and contrast materials (that can be used when comparing ANY 2 novels) can be downloaded for FREE at the end of this post! :)
First, we reviewed the good old VENN diagram with the following visual. I had the students glue this into their Writing Notebooks.

Next, we focused on the elements of compare and contrast, most importantly signal words. I had the students glue this into their Writing Notebooks too!
Students used the following guiding questions to help themselves compare and contrast the two novels.
Below is a final picture of one of my student's work... 
Next week, students will be working on their rough drafts using the Venn. 
Check back to see how that goes. 
Click on the picture above to download these materials!

Need Fundraising Ideas? Poetry Books Are Where It's At!

Sunday, March 6, 2016
This year our entire grade level in combining poetry from each class to make a POETRY anthology in order to raise money for our 5th grade end of the year events!  We are SO excited about this and even more excited to get some of their poetry in the hands of their friends and families to share. My entire class delved into poetry head on. Was it easy? NO! This year, our focus has mainly been the dreaded 5. paragraph. essay. SO I think it was a very welcome change for my students to try something new.  The beauty about poetry? There are no paragraphs to write. It doesn't matter how long or how short it is…poetry has very few rules….because…it is poetry!!! :)

One thing my students have been practicing this year is figurative language.  So I thought, why not put all of the different types of figurative language together into one poem! What the students came up with was inspiring, refreshing, amazing AND revealed SO much about their individuality and personalities! 

The directions were to write figurative language related to one topic.  Something they wanted to become or positive qualities about themselves.  The hardest part? For the students to stay on topic…but once they could differentiate between what belonged and what didn't really "go" with the theme of their poem, they came out great! Here are some of my FAVS!
I LOVE how she drew a fork in the road to illustrate good vs. bad paths we can take in life.  
I LOVE how even some of my struggling students wrote the most AMAZING poems!
Here are some more examples!
To make their pictures more vibrant, I actually took a photo of their drawing, inserted it into a Power Point slide, selected the photo, selected the recolor option in the menu bar, and then selected the top right color saturation option.  This really made the text stand out when changed to white and I just LOVE how they look!


These are going to look GREAT in our 5th Grade Poetry Fund Raising Book all compiled together…and HOPEFULLY we will raise a lot of $$$ for our end of the year activities. WIN/WIN!!
If you would like to try this out with your class, click on the link below to purchase 
all of the templates that can guide them through the process!
Powered by Blogger.
Back to Top